If you are a software developer, DevOps engineer, or Cloud Architect, you already know that the modern public cloud is a magnificent but dangerous double-edged sword. On one hand, you are granted infinite global scalability and the power to provision complex infrastructure with a few lines of code. On the other hand, you are constantly haunted by the unpredictable end-of-month cloud bill.
We have all been in that scenario where a developer spins up a massive testing environment for a quick Proof of Concept. The testing finishes, the expensive EC2 instances are terminated, but the attached Elastic IPs and EBS volumes are accidentally left behind. Fast forward three to six months, and your organization is hemorrhaging hundreds or thousands of dollars for completely invisible resources doing absolutely nothing. In the cloud-native world, we call these forgotten artifacts Orphan Resources, and they are consistently ranked by FinOps professionals as one of the primary culprits behind massive cloud wastage.
Today, we walk through a highly effective, modern approach to managing Infrastructure as Code, visualizing your deployments in real time, and automatically eliminating cloud wastage before it drains your engineering budget.
The Anatomy of Cloud Wastage
Before jumping into the practical tutorial, it is important to understand exactly why orphan resources exist and why AWS charges you for them even when you are not actively using them.
Unattached EBS Volumes
When you launch an EC2 instance, it typically comes with a root EBS volume. You might attach additional secondary data volumes for databases or file storage. When that EC2 instance is terminated, the root volume is usually deleted by default. However, secondary volumes are designed to persist independently to protect your data. This means they are almost always left behind when servers are destroyed.
AWS bills you for provisioned storage capacity in gigabyte-months, as well as provisioned IOPS and throughput, regardless of whether that volume is attached to a running server or floating unattached.
Unassociated Elastic IPs
Public IPv4 addresses are a finite, increasingly scarce global resource. AWS changed its billing model in early 2024 - now charging $0.005 per hour for all public IPv4 addresses, regardless of whether they are attached to a running service or completely idle. Holding onto an unassociated Elastic IP is pure cloud waste.
Finding these hidden resources manually using the AWS Console is tedious and error-prone. It requires clicking through multiple disconnected billing screens and filtering massive tables by resource states. To solve this, we use MechCloud, a platform that merges Stateless Infrastructure as Code with powerful visual asset discovery.
Step 1: Governance First - Configuring Regions and Zones
Security and cost governance does not start with deleting things. It starts with restricting where resources can be deployed. If your core customer base is in North America, there is rarely a good reason for a developer to spin up expensive GPU instances in Sydney or Tokyo.
In the MechCloud portal, the first step is configuring allowed regions for your AWS account. Navigate to Manage Cloud Accounts, select your target AWS account, and open the Configure Regions / Zones panel.
By default, the platform embraces a Zero Trust approach - all regions and availability zones are completely disabled. You must explicitly choose the specific regions where you want to allow provisioning or discover existing resources. In our walkthrough, we enable US East Ohio (us-east-2) and its availability zones. This single toggle acts as a powerful account-wide guardrail.
Step 2: Provisioning Resources and Simulating Messy Habits
Next, we move to the Stateless IaC module. If you are used to Terraform or Pulumi, you know the pain of managing state files - configuring backend S3 buckets, DynamoDB tables for state locking, and worrying about state drift. Stateless IaC handles all state mapping complexity on your behalf, letting you focus purely on the desired state in a simple YAML format.
To simulate a real-world messy development environment, we write a YAML configuration that provisions a standard web tier while intentionally injecting bad practices - an unattached Elastic IP and an unattached EBS volume.
resources:
  - type: aws_ec2_vpc
    name: vpc1
    props:
      cidr_block: "10.0.0.0/16"
    resources:
      - type: aws_ec2_subnet
        name: subnet1
        props:
          cidr_block: "10.0.1.0/24"
          availability_zone: "{{CURRENT_REGION}}a"
        resources:
          - type: aws_ec2_instance
            name: vm1
            props:
              image_id: "{{Image|arm64_ubuntu_24_04}}"
              instance_type: "t4g.small"
              security_group_ids:
                - "ref:vpc1/sg1"
      - type: aws_ec2_security_group
        name: sg1
        props:
          group_name: "mc-sg1"
          group_description: "SG for EC2 instance"
          security_group_ingress:
            - ip_protocol: tcp
              from_port: 22
              to_port: 22
              cidr_ip: "{{CURRENT_IP}}/32"
  - type: aws_ec2_eip
    name: eip1
  - type: aws_ec2_volume
    name: vol1
    props:
      availability_zone: "{{CURRENT_REGION}}a"
      size: 10
      volume_type: "gp3"
Notice the nested hierarchical structure. The subnet and security group are nested inside the VPC, while the EC2 instance is nested inside the subnet. This visual nesting makes architectural relationships immediately obvious.
We leverage dynamic platform variables: {{CURRENT_REGION}}a for the availability zone, {{Image|arm64_ubuntu_24_04}} for the correct AMI ID, and {{CURRENT_IP}}/32 to restrict SSH access to the engineer’s current IP address.
The intentional waste sits at the bottom - an aws_ec2_eip with no instance association and an aws_ec2_volume completely unattached to any compute resource.
Before hitting Apply, we generate a Plan. The platform analyzes the delta between the current empty state and our desired YAML state. The console shows eight resources to create, zero to update, zero to delete. But critically, it also shows a Cost Impact broken down granularly - compute price for the t4g.small instance, root disk cost, storage cost for the orphan gp3 volume, and idle IP cost for the unassociated Elastic IP. By surfacing actual dollar costs in the planning phase before a single API call is made, developers can make financially responsible decisions immediately.
Step 3: Discovering Assets and Visualizing the Wastage
Writing YAML is efficient for automation, but understanding complex resource dependencies through text alone is difficult. This is where visual Asset Discovery becomes indispensable.
We navigate to the Discover Assets tab, select our AWS account, target the us-east-2 region, and click Update to fetch the live state.
The platform generates an interactive topology map of the running AWS environment. It is a nested, hierarchical representation that mimics real cloud architecture. The outer box represents the AWS Region. Inside, we see availability zones, our VPC, subnet, and the running EC2 instance with its details.
The critical part lies at the top of the canvas. Our unattached Elastic IP and unattached EBS Volume are rendered with a bright RED header.
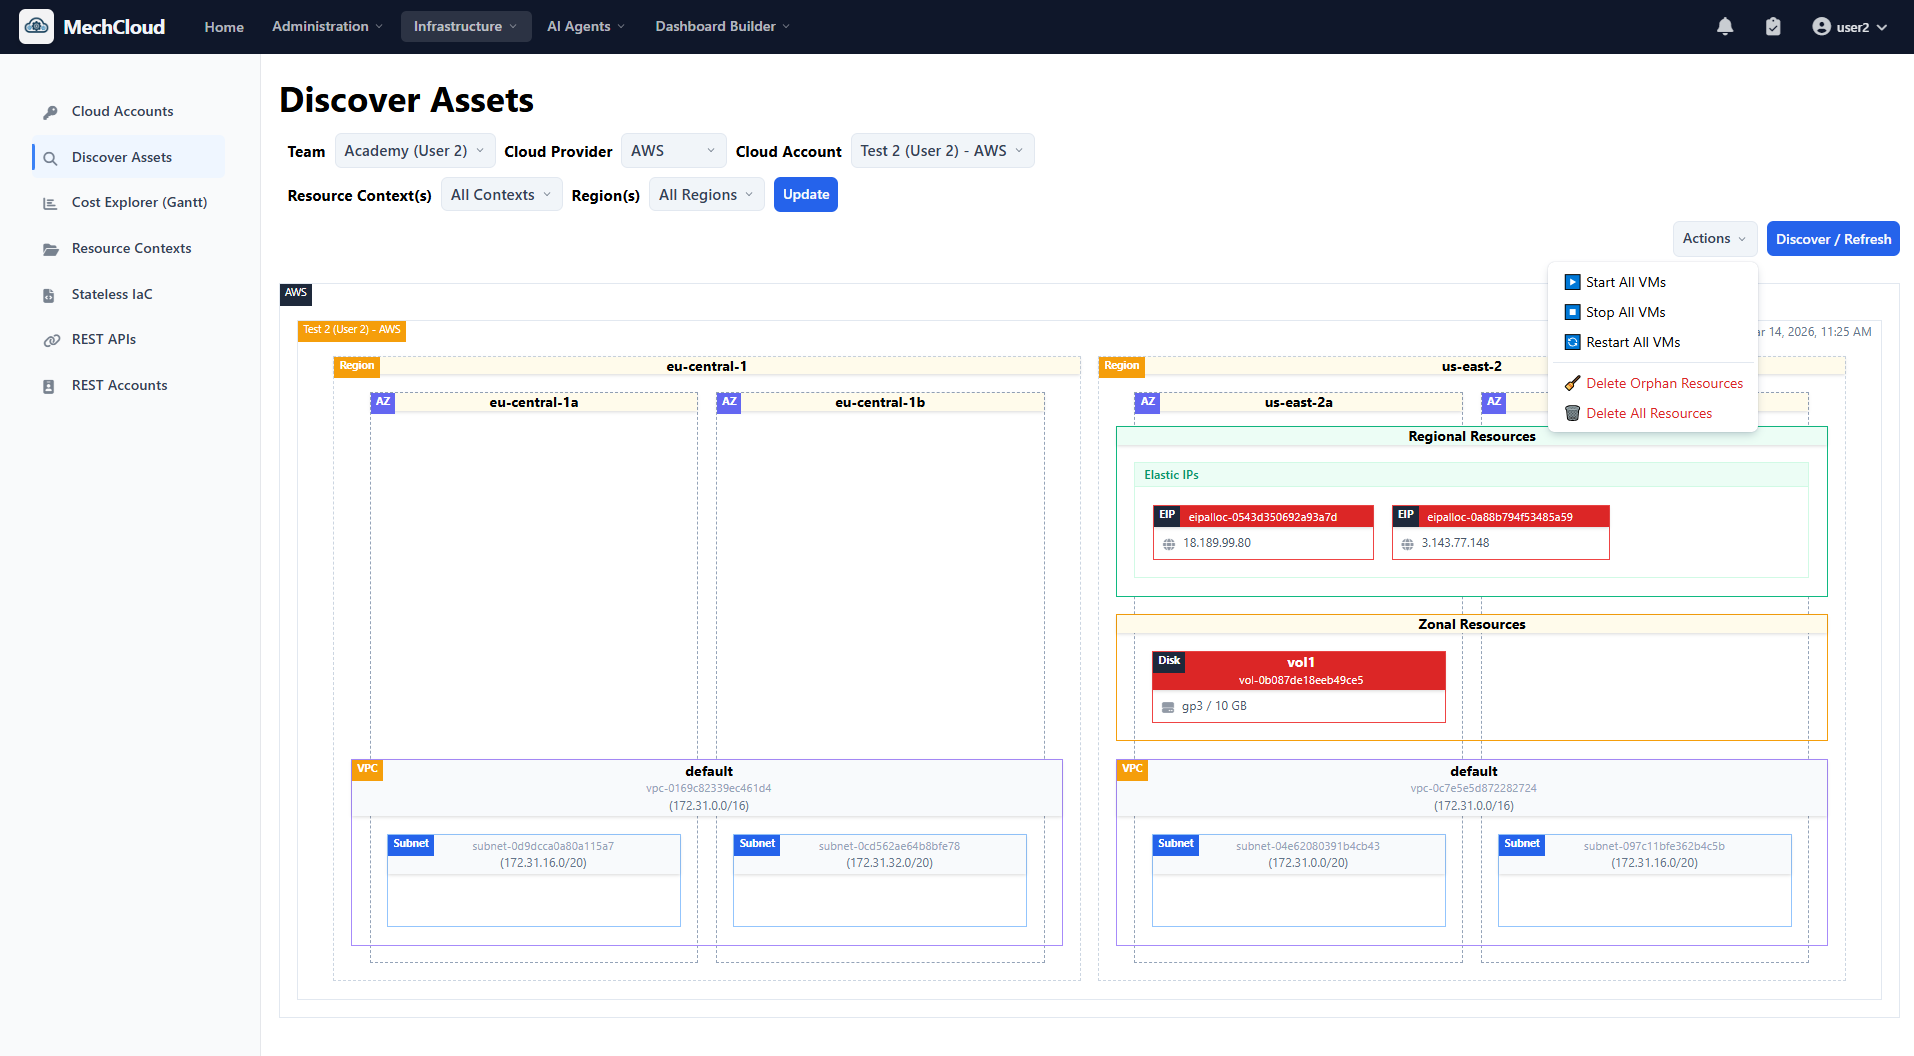
The discovery engine automatically analyzes all resource relationships and attachment states. Because these resources are not attached to any running instance or network interface, they are immediately flagged as Cloud Wastage. No Python scripts, no custom AWS Config rules, no waiting for a billing alert.
Step 4: Deleting Orphan Resources
Identifying waste is only half the battle. Remediating it safely is the harder half. Traditionally, cleanup requires context switching to the AWS Console, cross-referencing resource IDs, double-checking they are not meant to be attached to something offline, and manually deleting them one by one.
With MechCloud’s visual discovery, remediation is built into the UI. In the Discover Assets view, click the Actions dropdown and select Delete Orphan Resources.
A confirmation modal lists exactly what will be destroyed - one unattached volume (vol1) with its exact volume ID, and one unassociated Elastic IP (eip1) with its exact IP address. Click Delete Orphans.
Within seconds, the topology map refreshes. The red warning boxes disappear. Your monthly bill is instantly optimized. This single feature represents a massive quality-of-life improvement for SRE and FinOps teams who historically spend hours every week chasing cloud leakage.
Step 5: Deprovisioning the Entire Environment
Assume the PoC project is finished. Time to tear down the rest of the infrastructure.
Because we use declarative IaC, we do not need to manually delete resources in the correct order. No frustrating VPC dependency errors from forgetting to delete a security group or internet gateway first.
We return to the Stateless IaC editor and replace the entire YAML with an empty state:
resources: []Click Plan. The engine calculates the delta against the active resources:
- Plan generated: 0 to create, 0 to recreate, 0 to update, 6 to delete
[DELETE] aws_ec2_instance -> vm1[DELETE] aws_ec2_security_group -> vpc1/sg1[DELETE] aws_ec2_subnet -> vpc1/subnet1[DELETE] aws_ec2_vpc -> vpc1
The platform calculates a negative cost impact - a tangible dollar amount saved per month. Click Apply, and the platform handles the complex AWS dependency graph automatically - terminating the instance first, then deleting the subnet, security group, and VPC in the correct order.
Navigate back to Discover Assets and refresh. The topology map is completely empty. Zero lingering resources, zero orphan volumes, zero unattached IPs, zero surprises on the next invoice.
Why This Workflow Matters
1. Bridging the Gap Between Code and Visibility
Developers live in code (IaC), while Operations teams thrive on visibility (topology graphs). By combining Stateless IaC with immediate visual asset discovery, teams create a shared language. You write the code and immediately see the architecture you built, including its flaws.
2. True Shift-Left FinOps
Cost optimization is usually reactive - a billing alert triggers, a manager gets angry, an engineer is tasked with figuring out why the bill spiked. By integrating granular cost estimation directly into the IaC Plan phase, cost management is shifted left into the development cycle. The developer sees the price tag before they build.
3. Frictionless Waste Management
Orphan resources pile up because cleaning them involves friction - context switching, tedious console navigation, and fear of accidentally breaking production. Highlighting orphans in bright red and providing a one-click Delete Orphans action removes the friction entirely. When doing the right thing is the easiest thing to do, your team will naturally maintain a leaner cloud environment.
Conclusion
Managing complex cloud infrastructure does not have to be a black box of unpredictable costs and forgotten resources. By adopting Stateless IaC for predictable deployments combined with visual asset discovery for continuous monitoring and one-click remediation, you can regain complete control over your AWS environments.
The workflow we explored - from configuring regional guardrails and provisioning with full cost awareness, to visually identifying orphan resources and executing automated teardowns - is the blueprint for maintaining a healthy, lean, and cost-optimized cloud presence.
Stop letting unattached volumes and idle IP addresses quietly drain your engineering budget. Visualize your architecture, automate your cleanup, and take control of your cloud costs.
Get started for free or join our Discord community for support and updates.